Build a Resource Plan
This article explains how to build a OnePlan Resource Plan at the plan level.
Note
The plan-level resource plan will then roll up to the Global Resource Plan for the Resource Manager to review.
A Resource Plan is for high-level allocation of resources to your plan. This is not yet detailed task planning. For example, rather than build out a detailed schedule of tasks for John, you would instead commit John 50% of his time for the next four months.
Later, after the Resource Plan is built, you will import the Labor costs into your Financial Plan, based on the resource plan. Also, for portfolio analysis, you will be able to assess which plans to move forward and when based on the resource needs across all plans compared to the overall availability of your resources.
Important
This article assumes the Negotiations feature is DISABLED / not in use. See How is resource planning done with the Negotiations feature enabled? for the specific differences if the Negotiations feature is enabled.
1. Navigate to the Resource Plan Module
Navigate to the Resource Plan page for your plan, if not already there, by clicking Resource Plan in the Header.

2. Select the Resource Plan Cost Type
Before booking resources to your plan, be sure you are viewing the correct cost type if your environment has multiple. Select the desired cost type from the drop-down menu.
Note
Resources must be assigned a role to import their timesheet (actual) hours into the resource plan.

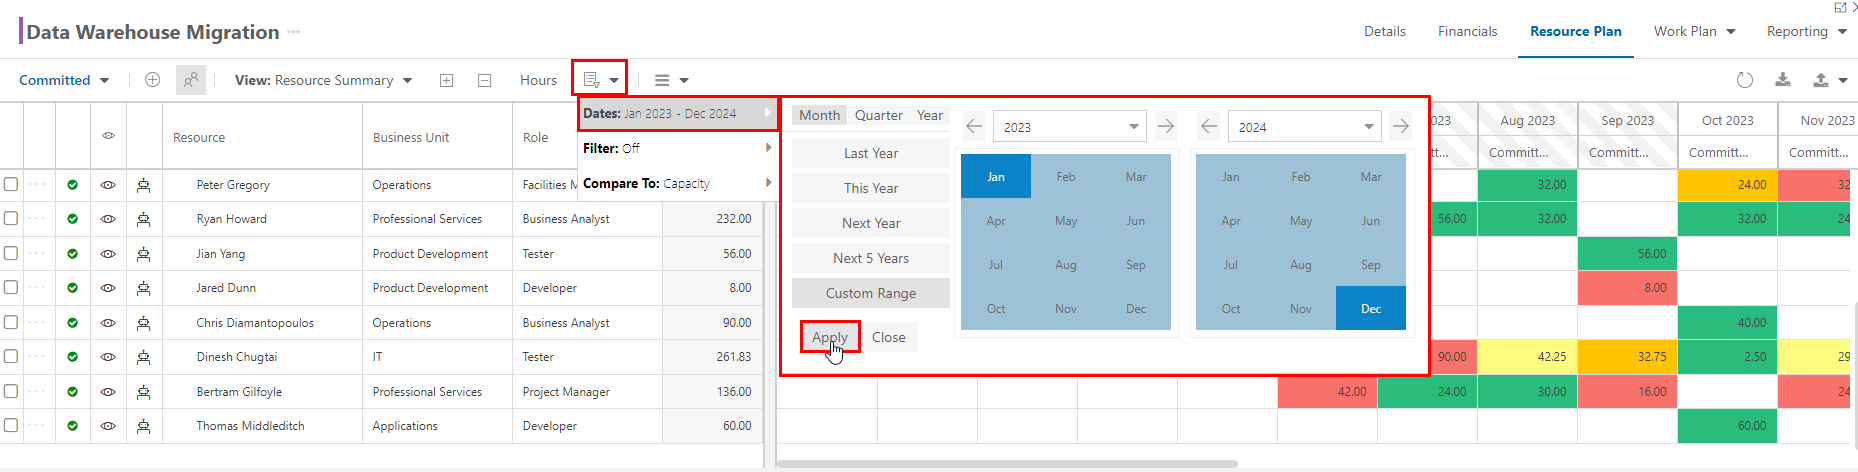
3. Select the Period Length and Date Range
Click the Resource Plan View Options menu in the header. Then select Dates.
Select the desired period length (monthly vs quarterly vs yearly) and date range to which you will be adding resource allocations.
Note
If you enter hours values into larger periods, such as into quarters or years, then switch to months, the values will be split across the months based on the calendar working days per month/periods.
Click Apply to apply the set date range to the resource plan view.
4. Add Resources or Teams to the Resource Plan
In OnePlan, there are two ways to add resources or teams to your Resource Plan:
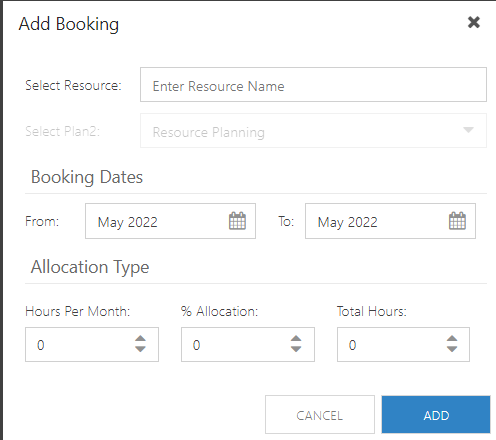
Bookings in OnePlan is a way to quickly allocate resources or teams to your resource plan. Bookings are set for a certain time period and will allocate the resource or team evenly across that time period.
Click Add Booking  . The Booking form will open. Complete the form.
Select Resource: Begin typing the resource (either named or generic) or team name. Available matching resources and teams will show. Make your selection. You can select multiple resources and teams so you can make bookings for multiple resources at once.
(if applicable) Select Plan: Select the plan where you would like to add the booking.
Booking Dates: Set the date range for the allocation. Select a From and To month and year.
Allocation Type: Enter the value in ONE of the allocation types: Hours Per Month, % Allocation, or Total Hours. If you select Total Hours, the hours will be divided evenly across the time selected between the booking dates.
Click Add when done.
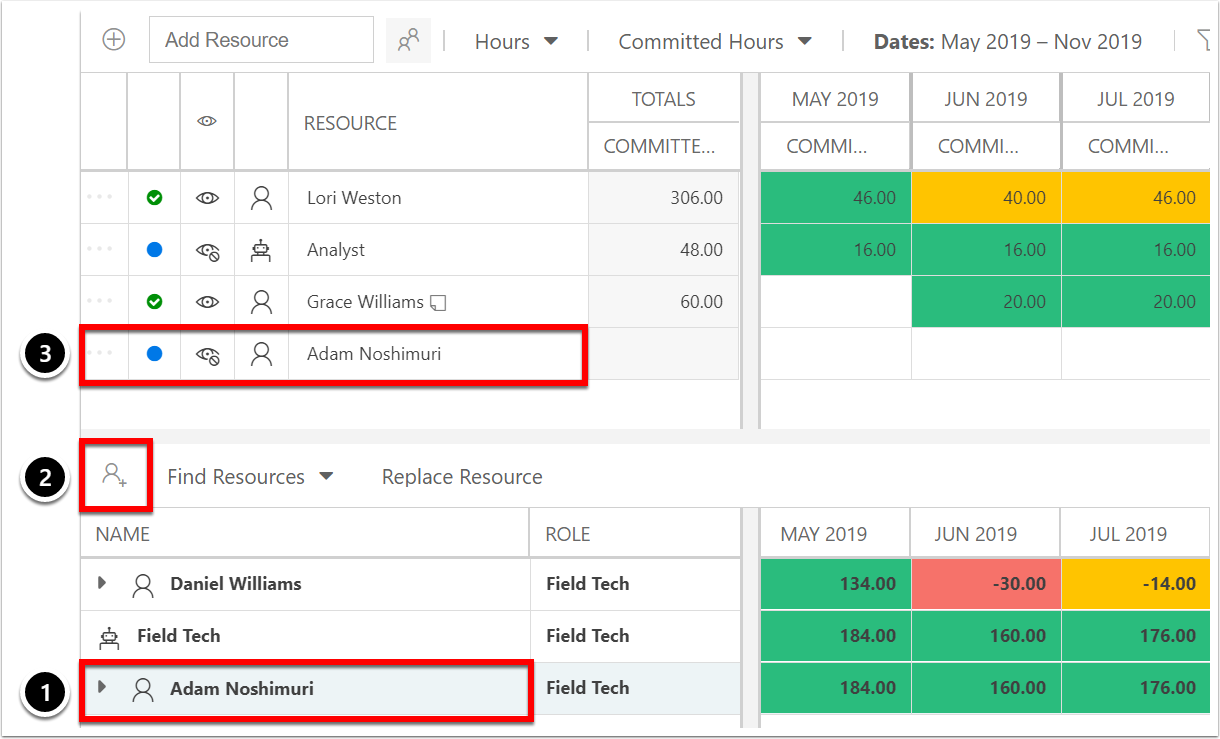
Open the Candidates List. Find and select the desired resource (whether a named resource or generic), or team. See Find Resources with the Candidates List.
Click the Add button.
The resource will be added to the resource plan above. Allocate the newly added resource as needed.
5. Add Resource or Team Allocations to the Resource Plan
There are two ways to add time allocations for resources or teams in your resource plan:
Verify you have the preferred planning mode selected (Hours, %, or FTE). This determines how the allocation values are displayed and calculated in the resource plan.

Add allocations manually into the Resource Plan. Click into a cell in the resource plan grid and type in the allocation.

Note
When you add time allocations to teams of resources, the time will automatically be split among the team based on how their individual time is allocated to the team itself (see Allocate Resources to Teams (Total Percentage and Time-Phased Allocation) for more information.)

You can manually change/override the automatic split by clicking into a cell in the resource plan and manually typing in the preferred allocation.

If desired, you may allocate time to your resources via the booking form rather than manually entering values. Select the row menu for a resource in the resource plan.
Click the Row Options menu (ellipsis) for the desired resource. Then select Allocate. The Bookings form will open.
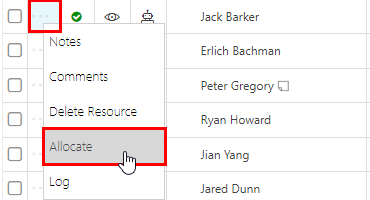
Complete the Bookings form.
Select Resource: Begin typing the resource (either named or generic) or team name. Available matching resources and teams will show. Make your selection.
(if applicable) Select Plan: Select the plan where you would like to add the booking.
Booking Dates: Set the date range for the allocation. Select a From and To month and year.
Allocation Type: Enter the value in ONE of the allocation types: Hours Per Month, % Allocation, or Total Hours. If you select Total Hours, the hours will be divided evenly across the time selected between the booking dates.
Click Addto add the resource allocation.
Note
Whatever is entered in the booking form will overwrite any existing resource allocation for the time between the booking dates.
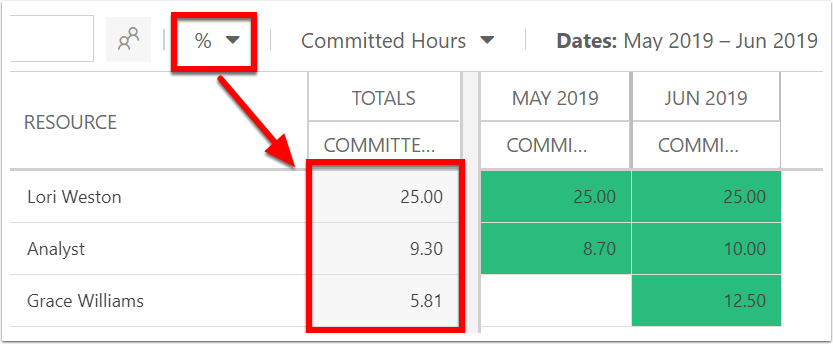
6. Review Resource Totals
There is a Totals column that shows the "total" per resource.
Note
The value in the total column is based on the periods shown in the view and the type of planning mode (hours, %, or FTE). Any periods not selected will not be included in the total.

If you have % selected, the value for the totals column would include the months/periods with no values & those with values.
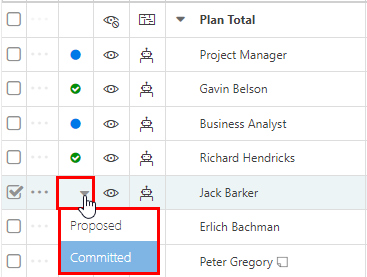
7. Update the Status of Resource Rows
Each resource plan rows has statuses, either Proposed or Committed. When a row is first added, the default status is Proposed, which shows as a blue dot. Then, when ready, the row can be changed to Committed, which shows as a green check mark. There are additional row statuses for organizations using the Negotiation feature.
To update the row status for a resource, click on the status icon next to the desired resource, then select the desired status from the drop-down.
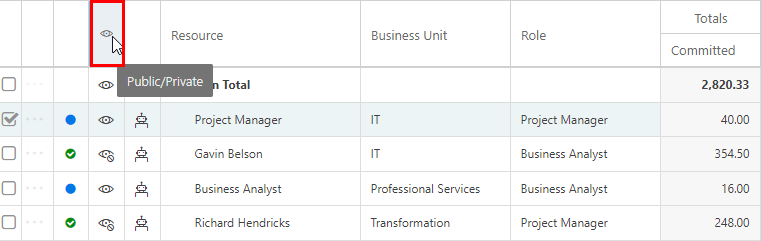
8. Set a Resource Row as Public or Private
If the Public/Private feature is enabled, an additional column shows whether each row is Private or Public.
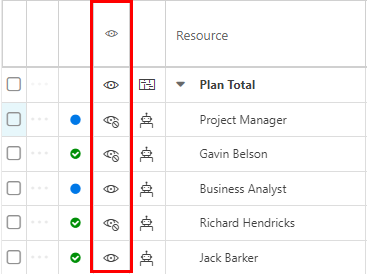
When a row is Private, that means that the row is not visible in reports or the Global Resource Plan. Think of Private rows as drafts. They are only available for the plan managers and owners to view and edit.
Private rows are indicated by  .
.
When a row is Public, that means that row is available for reporting and visible in the Global Resource Plan. Think of Public rows as published data. They are available for anyone (with the proper permissions) to see.
Public rows are indicated by  .
.
Click on the icon to toggle between Private and Public for each row.
You can change all rows from Private to Public at once by clicking the Public/Private icon in the column header.
9. Add Notes and Comments to Resource Rows
Add a Comment to a Resource Row
Comments allow you and your colleagues to have an asynchronous discussion on resource allocations in your resource plan. These comments will remain in a thread, and the thread will appear on the Home Page "Conversations" panel for quick access.
To add a comment to a resource row, click the Row Options menu (ellipsis) for the desired resource. Then select Comments. The Comments thread will open on the right side of the screen. You will be able to see the existing conversation and can add a comment to the thread.
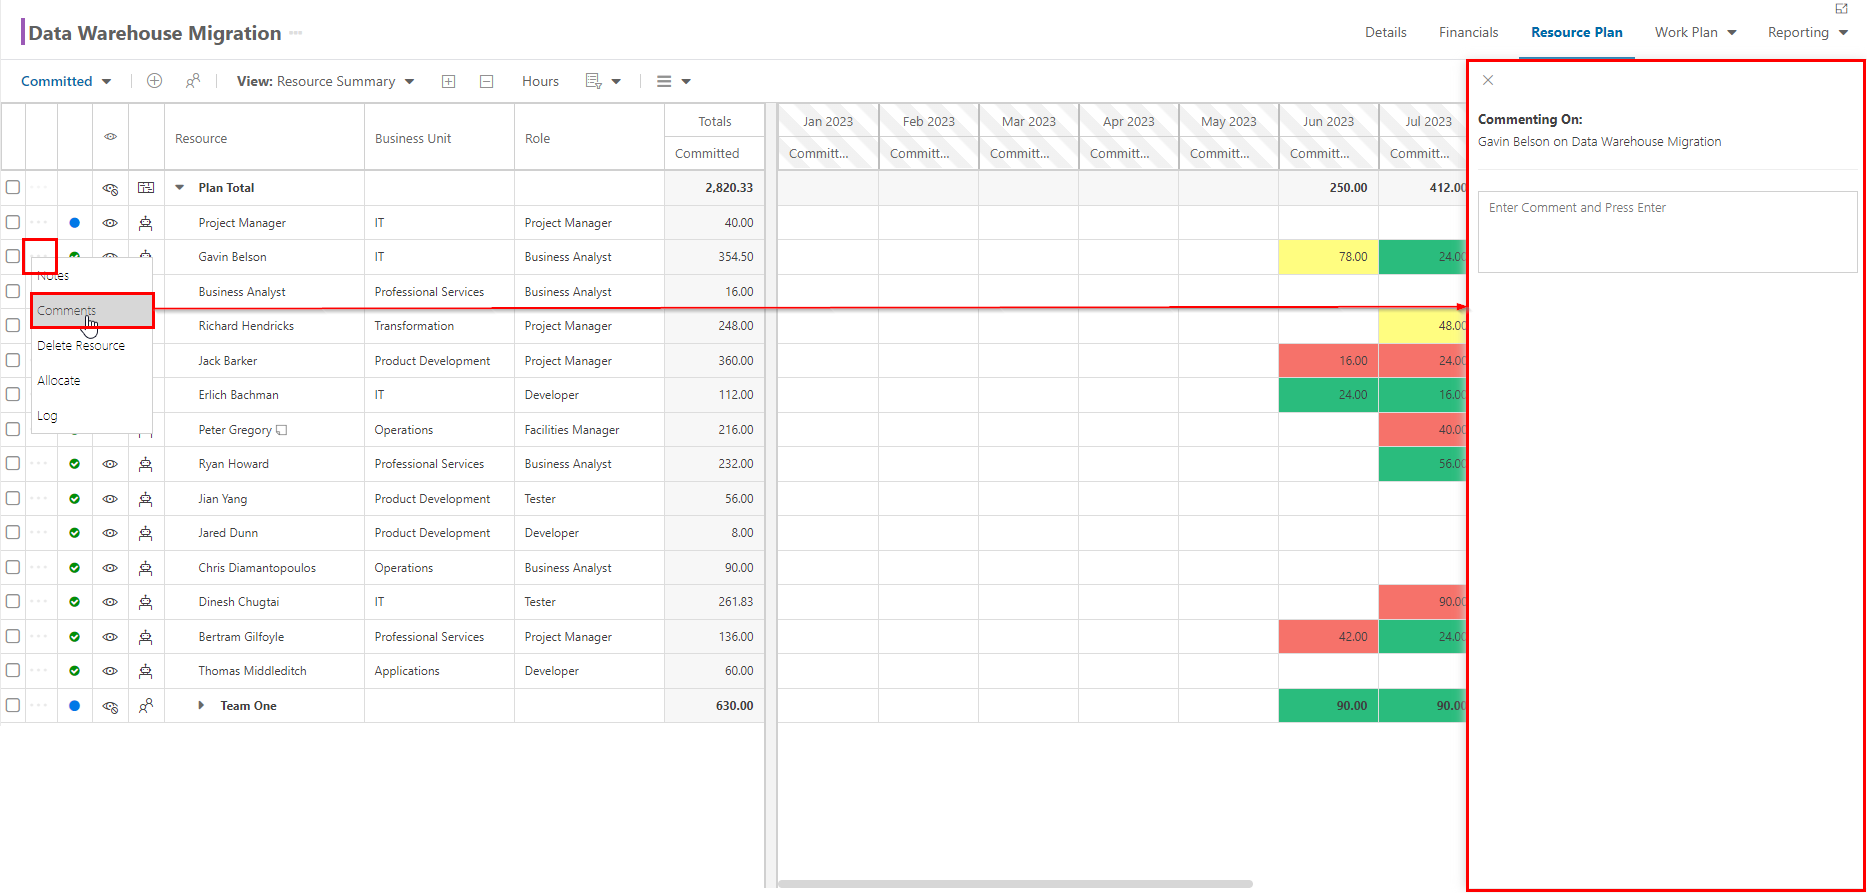
Once there are comments on a resource row, a speech bubble will appear next to the resource name.

Add a Note to a Resource Row
Notes allow you to add additional information to your resource allocations. Notes live in the resource plan, and nowhere else in OnePlan.
To add a note to a resource row, click the Row Options menu (ellipsis) for the desired resource. Then select Notes. The Notes form will open. Type out your notes in the Notes form, then click Save.

Once there are notes on a resource row, a sticky note will appear next to the resource name.

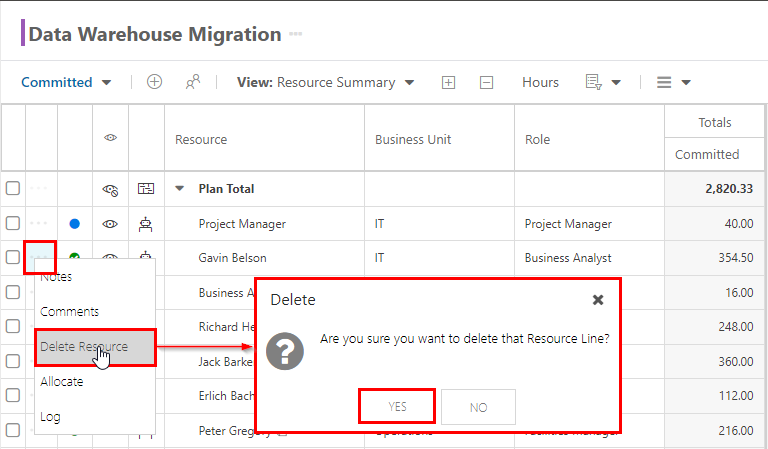
10. Delete a Resource from your Resource Plan
To remove a resource from your resource plan, click the Row Options menu (ellipsis) for the desired resource. Then select Delete. A confirmation will pop up. Click Yes to delete the resource.