Home Page Plans
This article explains how to use the Plans panel on your OnePlan Home Page.
The Plans panel on the home page lets you quickly view or search recent plans to pick up your work right where you left it.

Tabs and Search Bar
The Plans panel has several tabs to help you quickly find the plan you need. These tabs include:
Recent: Displays your most recently accessed plans.
Favorite: Displays all plans that you have marked as a favorite.
Plans I Own: Displays all plans that you are an owner of.
Plans Shared With Me: Displays all plans that have been shared with you by another plan owner.
All Plans: Displays all plans in your OnePlan environment that you have access to.

There is also a search bar that allows you to search each tab in the Plans panel. This search function is particularly useful if there are a lot of plans listed in a tab, such as in the All Plans tab. Simply begin typing in the name of the plan, and the plans will begin to filter based on your search.

Contextual Menu
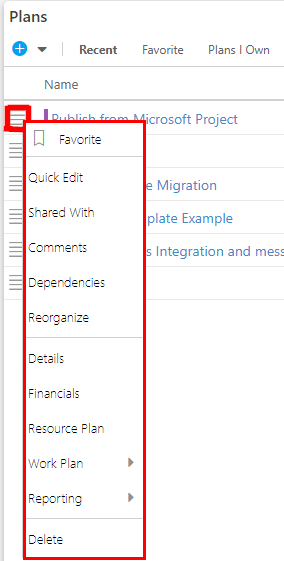
Select the contextual menu for a plan to see the available planning modules and options for that plan.

Favorite: Click Favorite to mark the selected plan as a favorite. This plan will then be listed in the Favorites tab of the Plans Panel on your Home Page.
Quick Edit: Select Quick Edit from the plan's contextual menu. On the right side of the screen, the plan details form appears, condensed to one column. Scroll up and down for the plan fields. Click the Expand icon to open a larger view of the plan details form. The form is editable and your edits save automatically.
Shared With: Click Shared With from the contextual menu to quickly access a plan's Shared With form. The Shared With form lists all of the users who have access to a particular plan, along with their plan-level permissions.
Comments: Click Comments to add a comment or access an existing comment thread for that plan.
Dependencies: Click Dependencies to access the plan dependencies form. From this form, you can view and manage dependencies between your various plans. See Portfolio Dependencies: Manage Dependencies Between Plans for instructions on how to manage these inter-plan dependencies.
Reorganize: Click Reorganize to reorganize the selected plan anywhere in your OnePlan group. Using the Reorganize function, you can change the plan type of the plan, and its place in your OnePlan hierarchy. The Reorganize function does not retain any historical information about the plan's previous type or location. It is simply a "lift-and-shift" function.
Details: Click Details to jump directly to the selected plan's Plan Details Form.
Financials: Click Financials to jump directly to the selected plan's Financial Plan.
Resource Plan: Click Resource Plan to jump directly to the selected plan's Resource Plan.
Work Plan
List: Click List to jump directly to the selected plan's Work Plan List view.
Board: Click Board to jump directly to the selected plan's Work Plan Board view.
Reporting
Status Reports: Click Status Reports to jump directly to the selected plan's Status Reports.
Visualize: Click Visualize to jump directly to the selected plan's Visualizer.
Insights: Click Insights to jump directly to the selected plan's Plan-Level Insights page.
Dashboard: Click Dashboard to jump directly to the selected plan's Power BI Reporting Dashboard.
Delete: Click Delete to access the Delete and Archive form. Here, you can either completely delete the selected plan (including all associated data), or archive the plan, which enables your administrator the ability to restore that plan at a later date.
See Delete or Archive a Plan for more information.
Create a New Plan
You can use the New Item icon  in the Plans section of the Home Page to create a new plan. See Create a New Plan for more information.
