Configure Insights
This article explains how to configure Insights settings. This requires the app 'Insights' to be installed. See How do I add apps?
Go to the Admin pages, select Insights in the navigation.
Resource Insights
Expand the Resource Insights topic heading.
Resource insights appear on the Home page for OnePlan users. See Review Your Insights for more detail on resource insights.
Edit Resource Insights
To edit a resource insight:
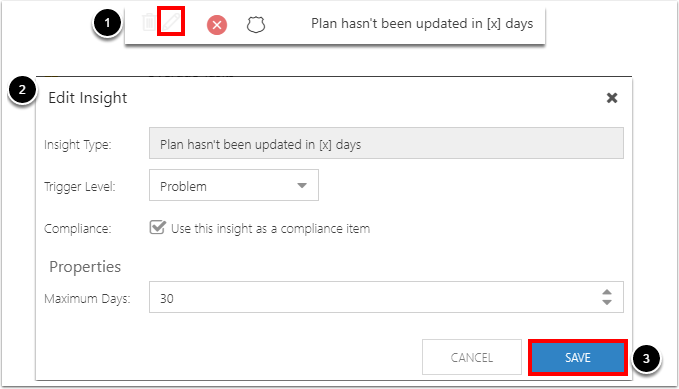
Click the Edit icon next to the desired insight. The Edit Insight form will open.
Update the Edit Insight form. Editable fields include:
Trigger Level: Select the trigger level for the insight. The trigger level indicates how severe an insight notification is. Options include Information, Warning, or Problem.
Compliance: Check the check box if the insight will be counted as a compliance item.
Click SAVE.
Remove Resource Insights
To remove a resource insight:
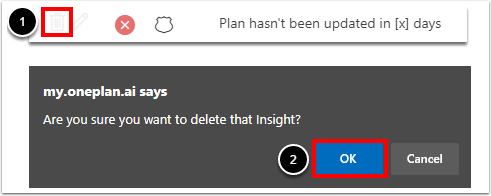
Click the Delete icon next to the desired insight.
Click OK on the pop-up warning to confirm the removal.
Add Resource Insights
NOTE: The Insights app comes with all of the resource insights pre-configured. You will not be able to create any new insights unless you remove some of the default insights.
To add a new resource insight:
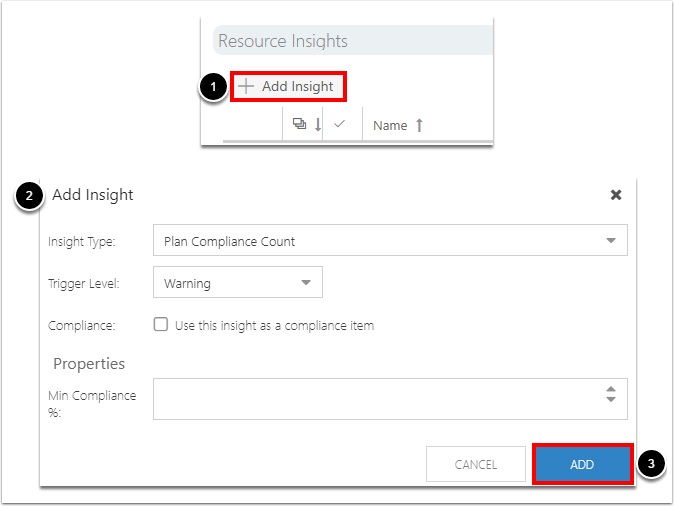
Click the Add Insight button. The Add Insight form will open.
Complete the Add Insight form.
Insight Type: Select an insight type. You are not able to customize resource insight types.
Trigger Level: Select the trigger level for the insight. The trigger level indicates how severe an insight notification is. Options include Information, Warning, or Problem.
Compliance: Check the check box if the insight will be counted as a compliance item.
Min Compliance % (If Applicable): Enter the minimum compliance percent to trigger the insight.
Click ADD.
Plan Insights
Expand the Plan Insights topic heading. Plan insights are pre-filtered by plan type. Click Plan Type and select the desired plan type from the drop down.
Plan insights appear in the Reports tab in a plan. See View Plan Insights for more detail on plan details.
Create a Plan Insight Category
To create a plan insight category:
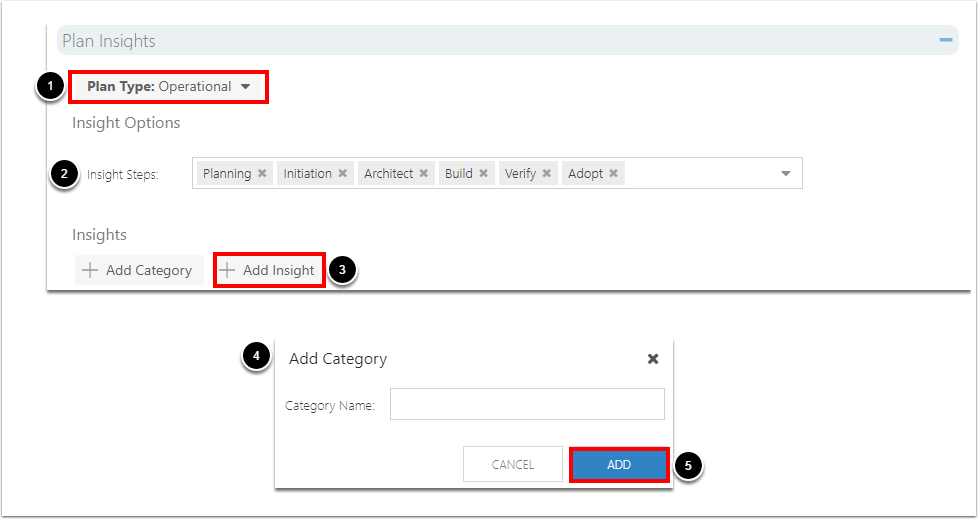
Click Plan Type and select the plan type to apply the new insight category.
(Optional) In the Insight Steps drop down, select the plan state(s) where the insight category can apply to.
NOTE: Insight steps are pre-selected based on the plan type. This applies to all insights within the selected plan type.
Click Add Category. The Add Category form will open.
Complete the Add Category form.
Category Name: Enter the name of the new category.
Click ADD.
Create Plan Insights
To create a new plan insight:
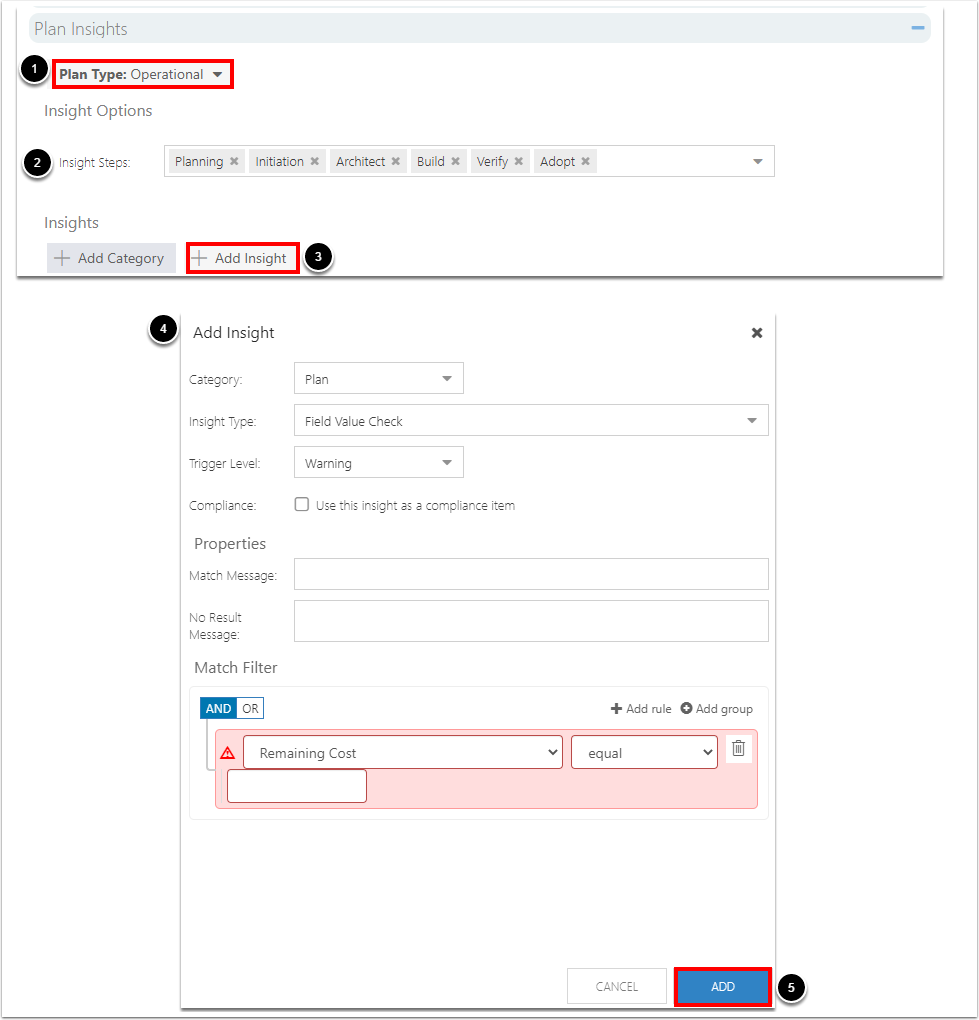
Click Plan Type and select the plan type to apply the new insight.
(Optional) In the Insight Steps drop down, select the plan state(s) where the insights can apply to.
NOTE: Insight steps are pre-selected based on the plan type. This applies to all insights within the selected plan type.
Click Add Insight. The Add Insight form will open.
Complete the Add Insight form.
Category: Select the insight category from the drop down. Categories are customizable and will vary.
Insight Type: Select the insight type from the drop down. Options include Plan has not been updated in [x] days, Task Field Value Check, Field Value Check, Plan has unsubmitted Status Reports, Plans should have a Financial Plan, Plan has task updates, and Plans should have a Work Plan.
Trigger Level: Select the trigger level for the insight. The trigger level indicates how severe an insight notification is. Options include Information, Warning, or Problem.
Compliance: Check the check box if the insight will be counted as a compliance item.
Maximum Days (if plan type Plan has not been updated in [x] days is selected): Enter the maximum number of days a plan can be stagnant before a problem insight is thrown.
Success Message (if plan type Task Field Value Check is selected): Enter a message to be displayed if the task field value check is successful.
Problem Message (if plan type Task Field Value Check is selected): Enter a message to be displayed if the task field value check fails.
Work Type (if plan type Task Field Value Check is selected): Select a work type from the drop down.
Filter (if plan type Task Field Value Check is selected): Create rules to compare task fields. The fields and comparison calculations available will vary based on your selections and OnePlan configuration.
NOTE: You can add multiple comparison rules.
Match Message (if plan type Field Value Check is selected): Enter a message to be displayed if the field value check is successful.
No Result Message (if plan type Field Value Check is selected): Enter a message to be displayed if the field value check fails.
Match Filter (if plan type Field Value Check is selected): Create rules to compare field values. The fields and comparison calculations available will vary based on your selections and OnePlan configuration.
NOTE: You can add multiple comparison rules.
Click ADD.
Edit Plan Insights and Categories
To edit a plan insight or category:
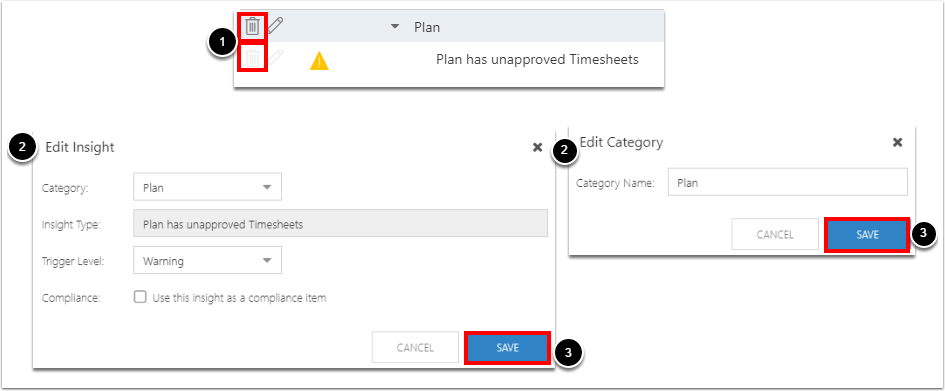
Click the Edit icon next to the desired insight. The Edit Insight or Edit Category will open.
Update the Edit Insight or the Edit Category form. Editable fields include:
Edit Insight
Category: Select the insight category from the drop down. Categories are customizable and will vary.
Trigger Level : Select the trigger level for the insight. The trigger level indicates how severe an insight notification is. Options include Information, Warning, or Problem.
Compliance: Check the check box if the insight will be counted as a compliance item.
Edit Category
Category Name: Update the name of the category.
Click SAVE.
Remove Plan Insights and Categories
To remove a plan insight or category:
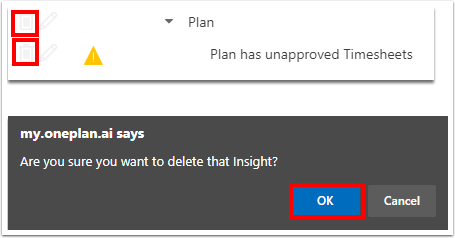
Select the Delete icon next to the desired insight or category.
Click OK on the pop-up warning to confirm the removal.
