Manage Field Calculations
This article explains how to create and manage field calculations in OnePlan. These settings are available when the Advanced Settings are enabled.
Go to the Admin pages, select Fields in the navigation.
You need to create a calculation for each scenario or value of a field that is part of that rule. For example, for a field to be set to true or false, create two calculations - one for when value should be set to True, and create one for when value should be set to False.
Many calculations have already been configured in OnePlan. For example, when the task % Complete field value is set to 100% or the Complete flag is set to true/checked, the Status field is updated to Completed. The reversed logic is also set as a calculation; when the Status field value is set to Completed, the % Complete field is updated to 100%.
Note
You cannot create calculations with other calculated fields. The calculation will not update and your information will be incorrect. You must use the initial field values to create all calculations.
Add a Calculation
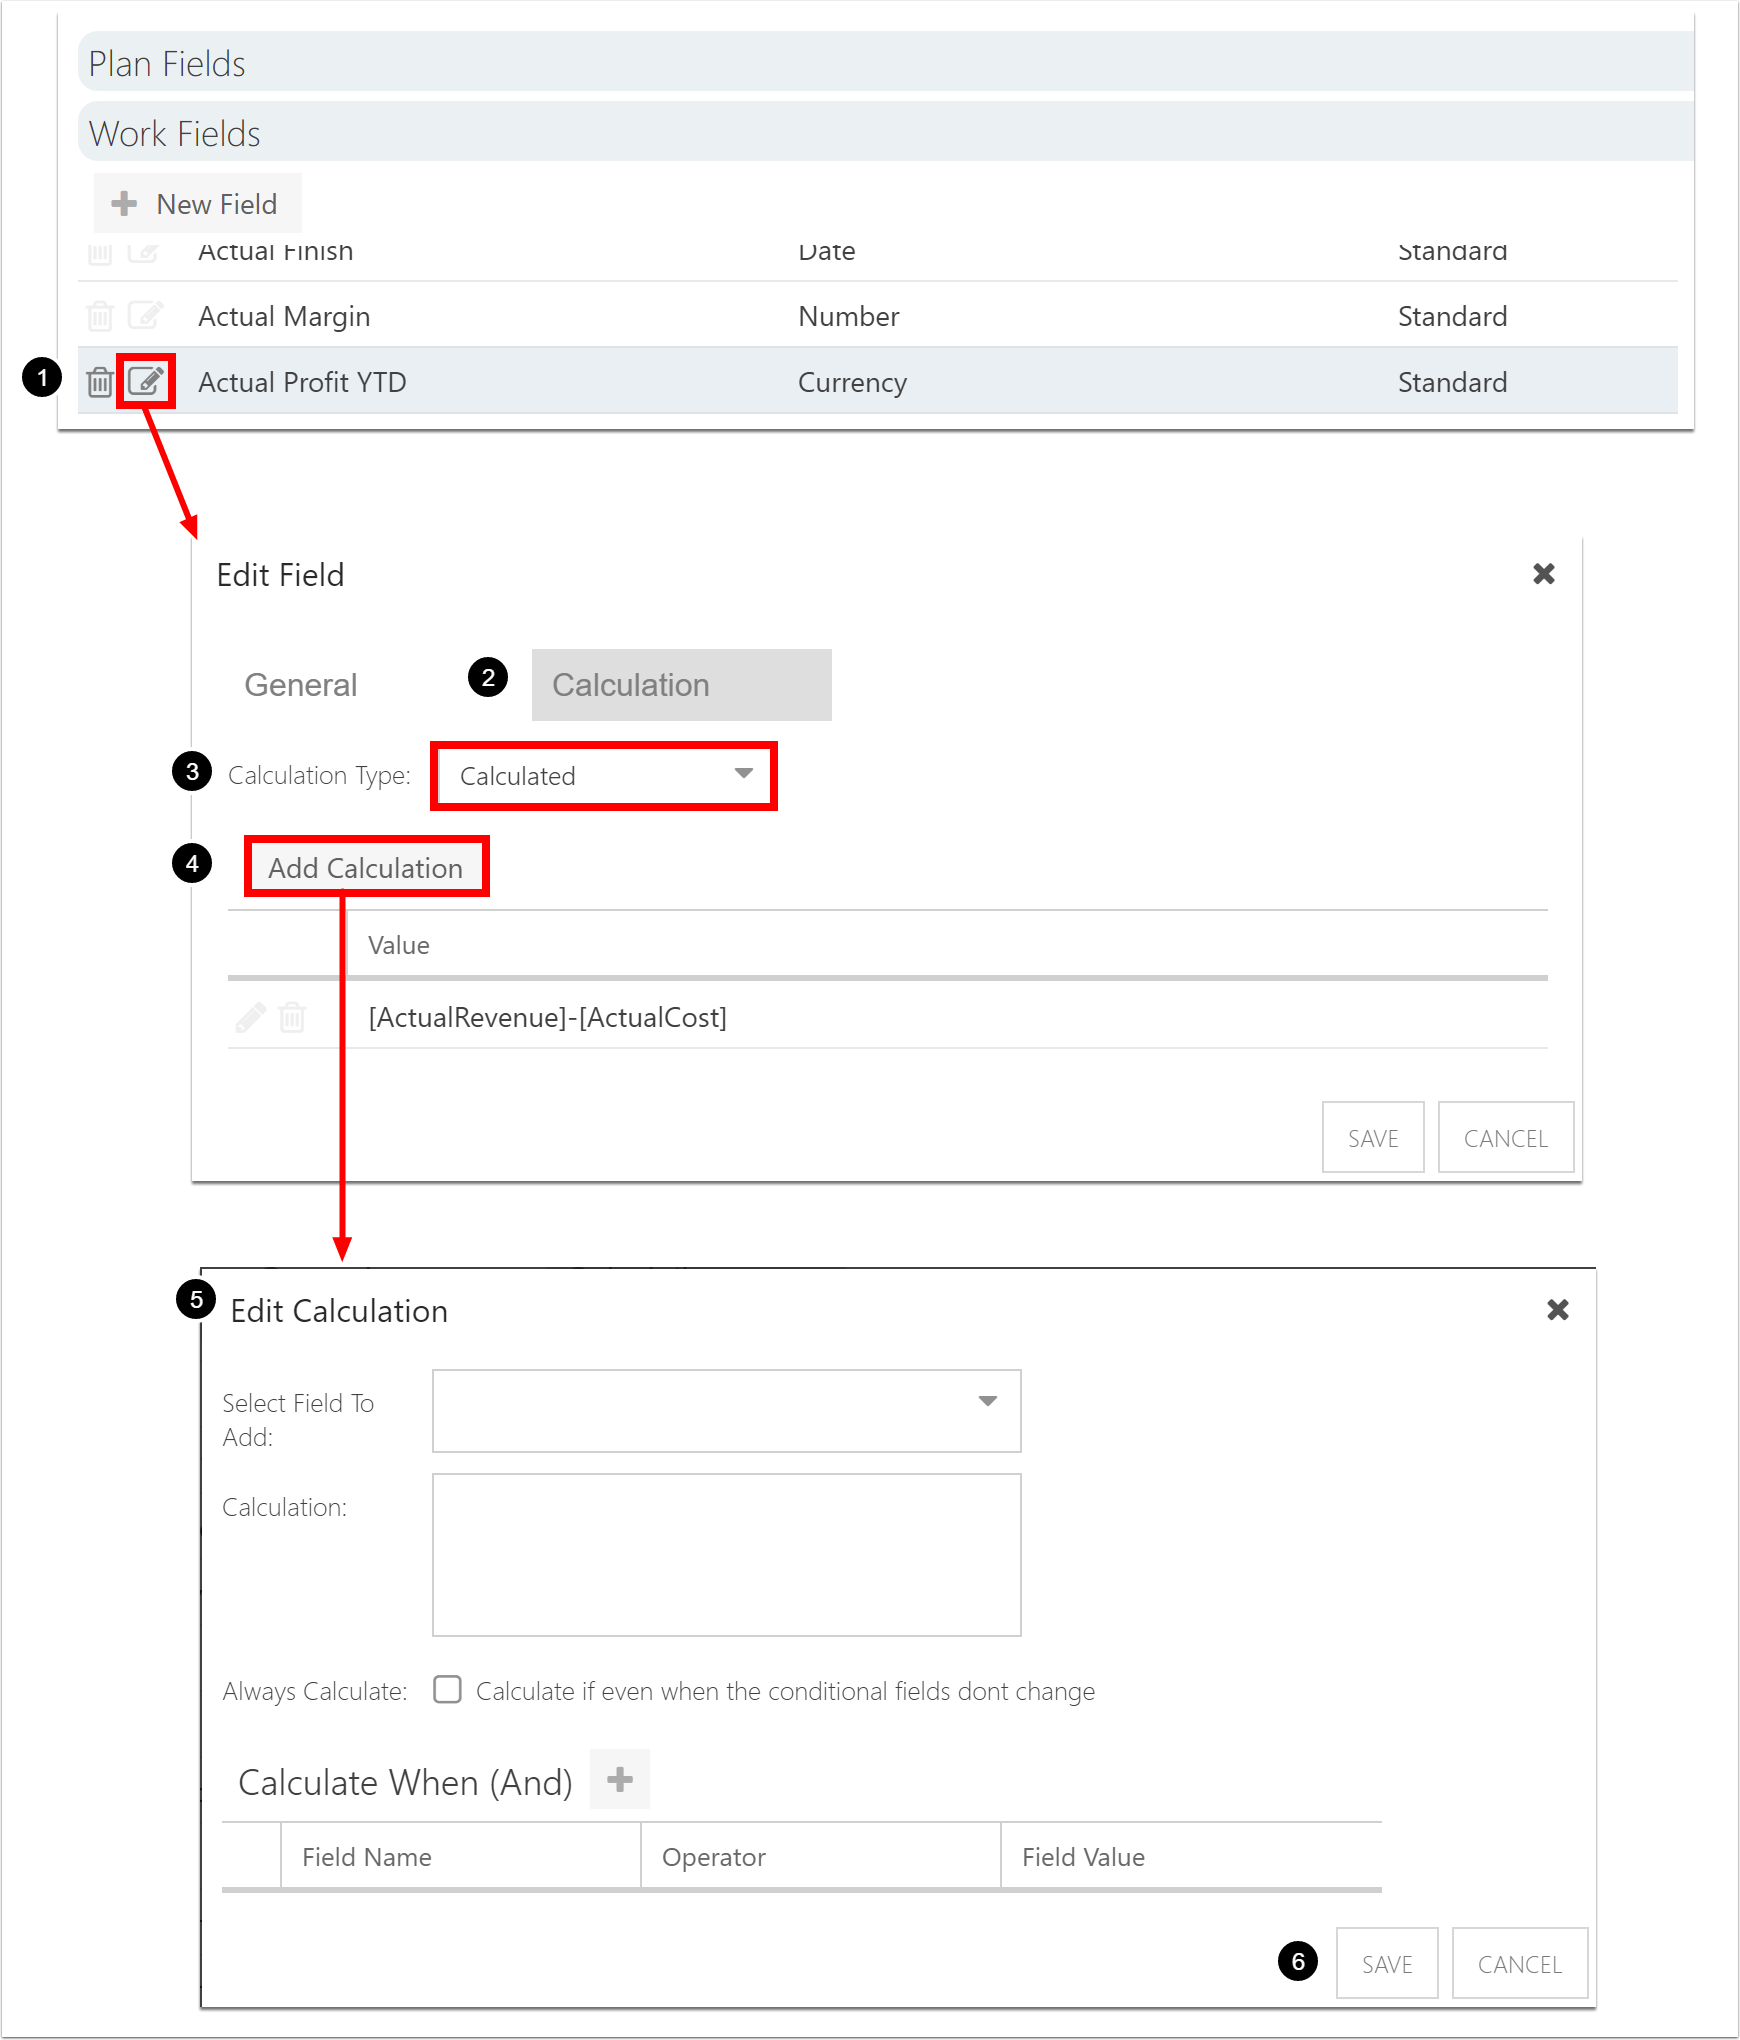
Go to the desired plan field under the Plan Fields topic heading, or work field under the Work Fields topic heading. Click the Edit icon next to the field you would like to add a calculation to. The Edit Field form will open.
Note
You can also create a new field and add a calculation. See How do I manage fields? to create a new field, then proceed with the rest of the procedure.
Select the Calculations heading in the Edit Field form.
Select Calculated in the Calculation Type drop down.
Click Add Calculation. The Edit Calculation form will open.
Complete the Edit Calculation form.
Select Field To Add: Select the a field you would like to use in your calculation. The selected field will populate the Calculation field below.
Note
Do not select a calculated field. You cannot create calculations with other calculated fields. The calculation will not update and your information will be incorrect.
Calculation: Build your calculation in the field. Use selected fields, or enter values.
Available calculations include:
Basic math (addition, subtraction, multiplication, division).
DATEDIFF([field 1], [field 2]). This function calculates the difference between two date fields.[AssignmentCost]. This function multiplies effort by cost using your organization's rate tables.[AssignmentRevenue]. This function multiplies effort by revenue using your organization's rate tables.
Always Calculate: Check the check box if you want the calculation to run even when the conditional fields do not change.
Calculate When (And): Add one or more rules/logic for the calculation.
Click SAVE.
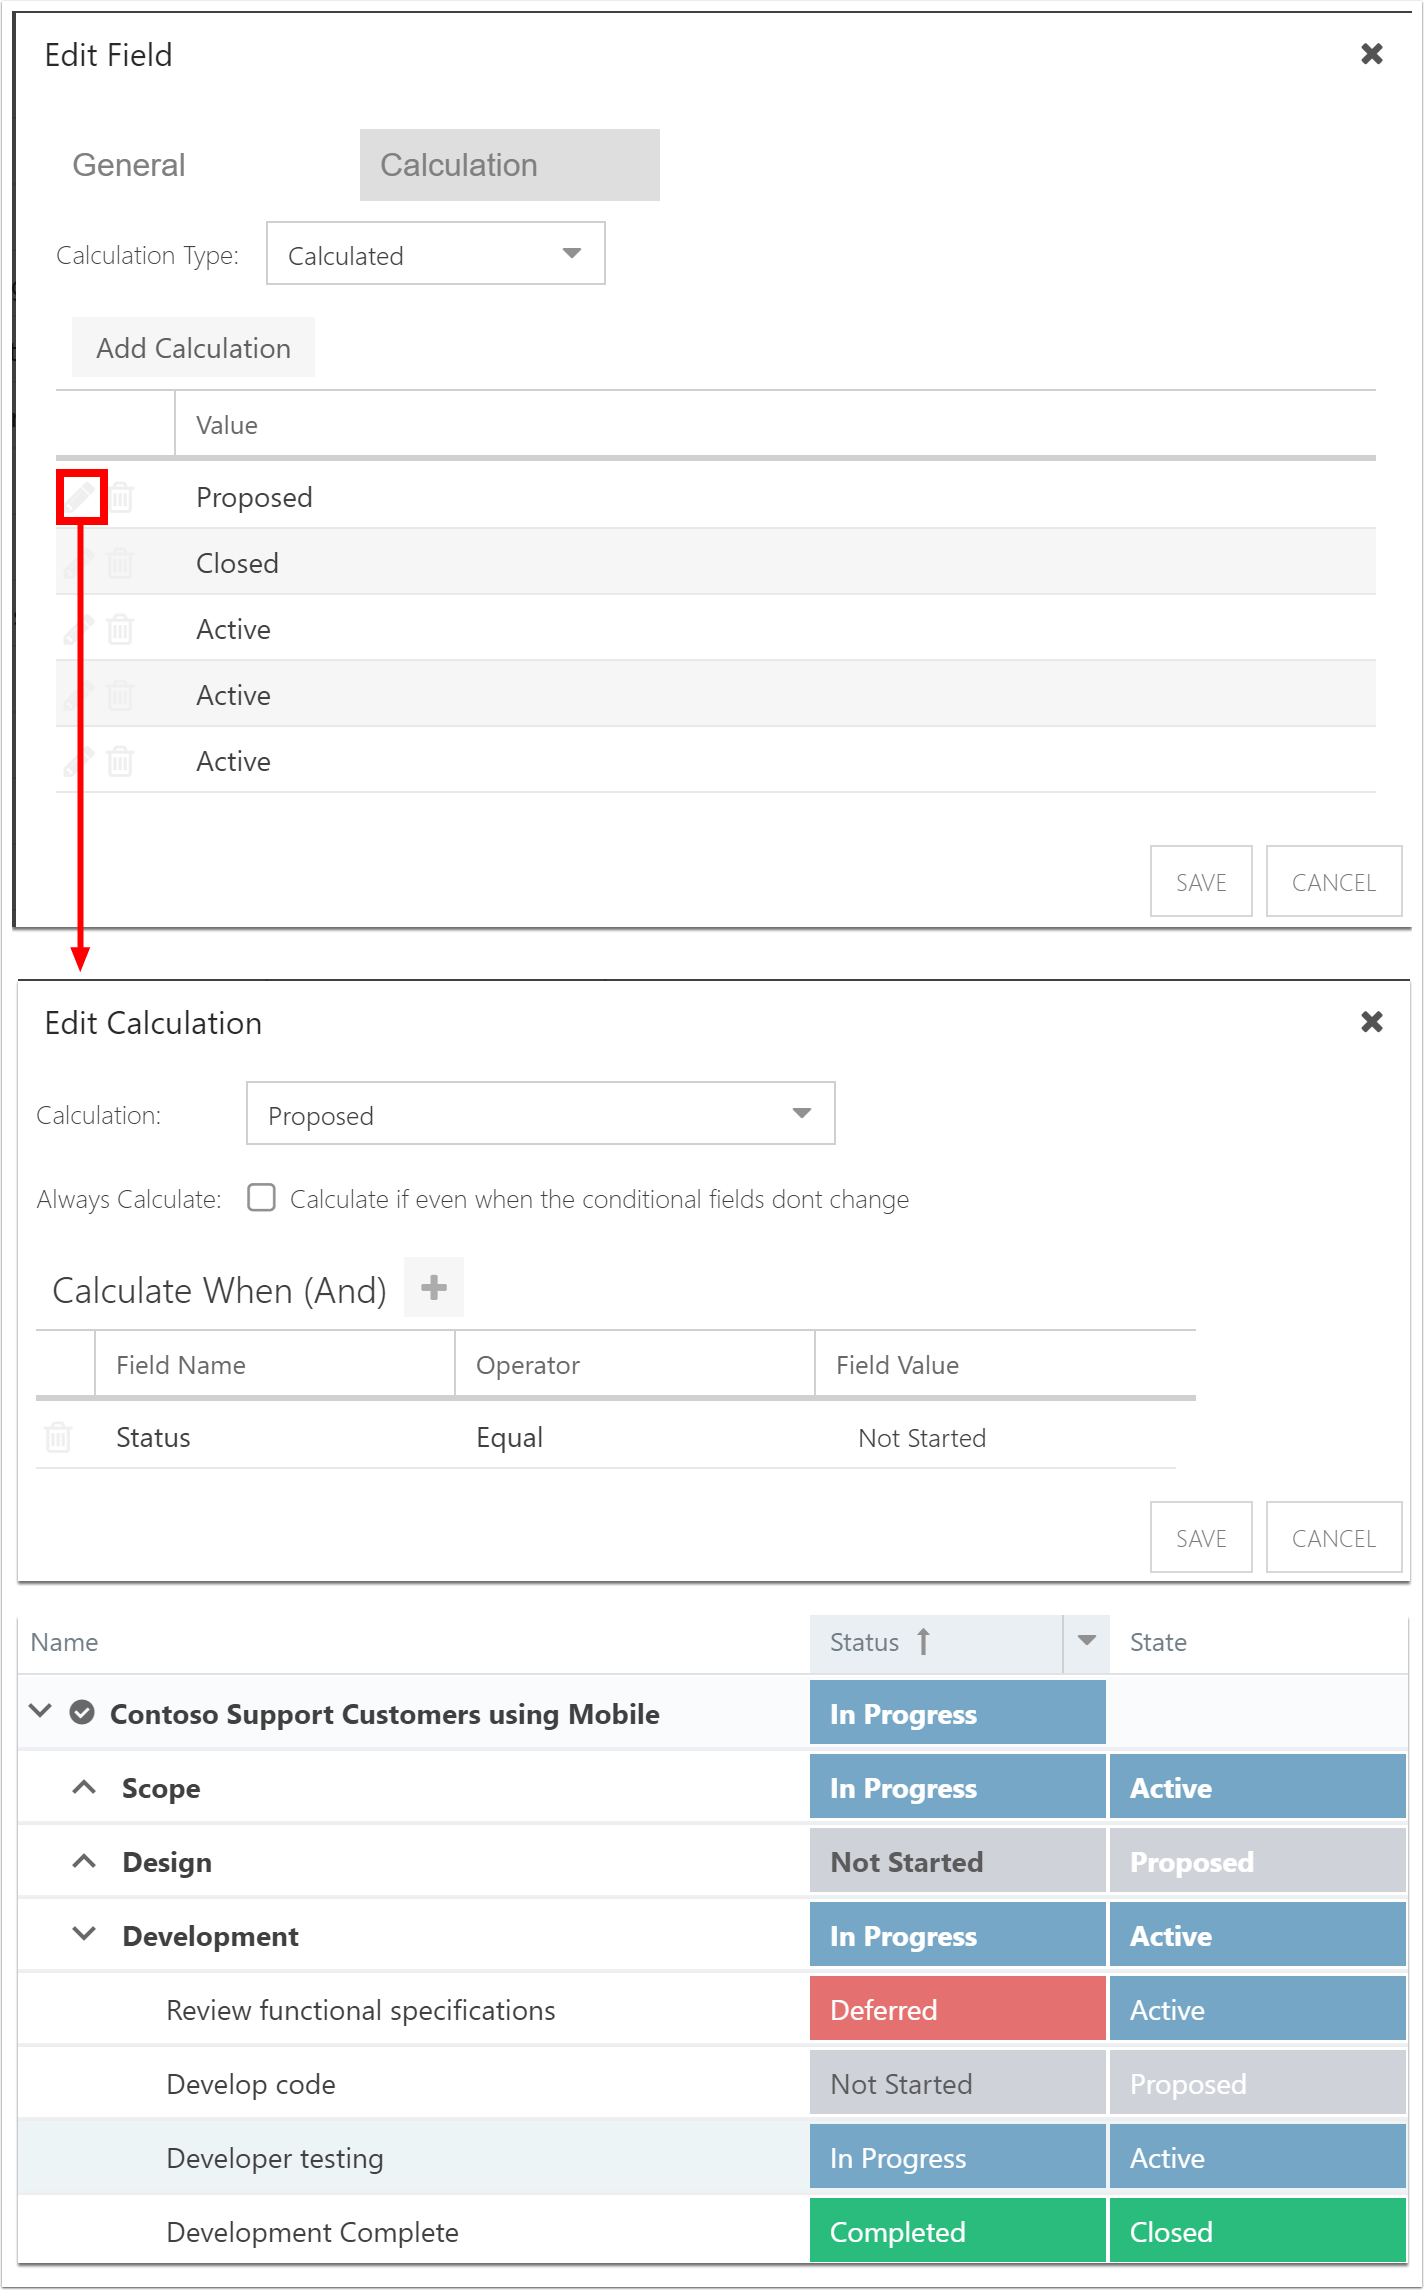
Calculation Example
In this example, we will look at the State task field.
There are three states that a task can be in: Proposed, Active, and Closed. Each of these states has its own calculation(s):
Proposed: When the Status field is set to "Not Started".
Active: When the Status field is set to "In Progress", "Deferred", or "Waiting for someone else".
Closed: When the Status field is set to "Completed".
In the project Work Planner, when a task status is set to "In Progress", for example, the State field will update to "Active" based on the calculation for that field.
Add a Rollup
Rollups are another form of a field calculation that calculate and display aggregate values from the work items (i.e. Tasks, Issues, Backlog, etc.) at the parent plan level. Rollups are configured at the plan level, with various options for how the values are aggregated and filtered. For example, count of active issues, sum of task effort (hours), sum of backlog remaining hours, etc.
When configured, the rollups auto-calculate on a scheduled basis across the system. Additionally, they can be recalculated on-demand using the Calculate Rollups button on the Plan Details form. See Schedule Automatic Field Rollups.
To add a rollup calculation to a field:
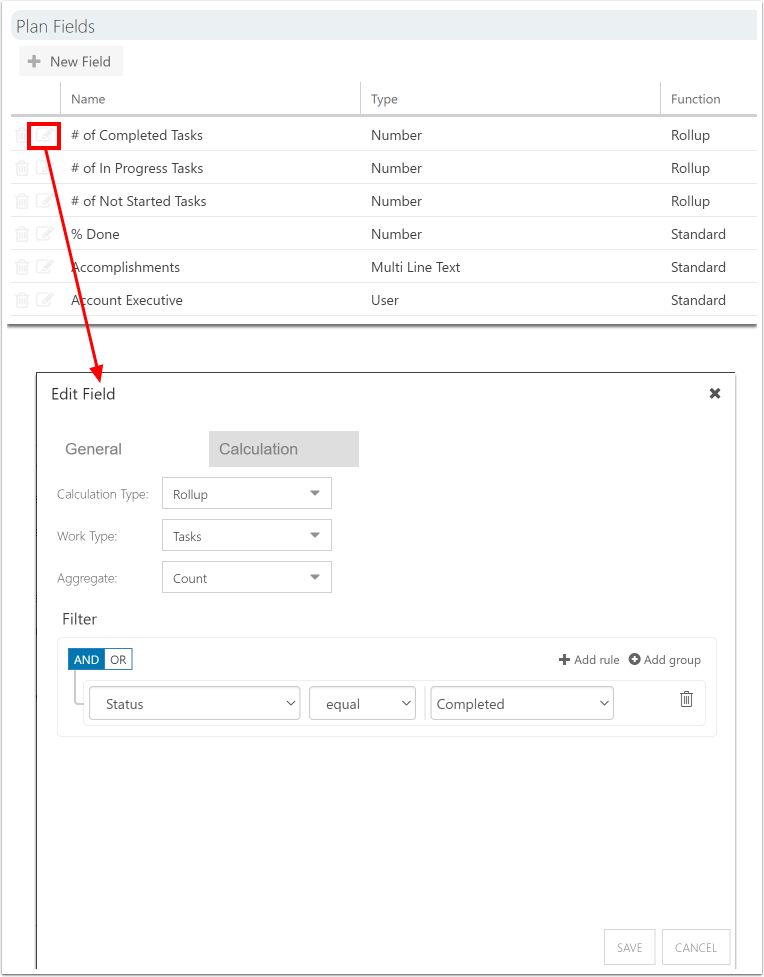
Go to the desired plan field under the Plan Fields topic heading. Click the Edit icon next to the field you would like to add a calculation to. The Edit Field form will open.
Note
You can also create a new field and add a calculation. See Create and edit fields to create a new field, then proceed with the rest of the procedure.
Note
Rollup calculations are only available for Number, Currency, and Date field types. Ensure one of these field types is set for the Field Type field.
Select the Calculations heading in the Edit Field form.
Select Rollup in the Calculation Type drop down.
Complete the Edit Calculation form.
Work Type: Select the work type where the rollup data will come from. You can select Plan to create a rollup field for associated plans.
Lookup Field:Available when Work Type is set to Plan. Select the plan field to calculate the rollup.
Aggregate: Select the aggregate calculation to perform on the rollup data.
Filter: Add one or more rules/logic for the rollup calculation.
Click SAVE.
Note
Status and % Done require a start and due date, or duration, to rollup to the plan level. See Status and % Done for more information.
Status and % Done
Status and % Done require a start and due date, or duration, to rollup to the plan level. This is because:
The % Done rollup is weighted by duration. For example, if you have one task that is 5 days long, and another that is 10 days, you get more % Done credit for the 10 day task.
Status and % Done are connected. Updating Status updates % Done (for example, a status of In Progress = 50% done, a status of Completed = 100% done). Status itself doesn't really rollup, % Done rolls up and if % Done is greater than 0 then Status is updated to In Progress; % Done is equal to 100 then Status is updated to Completed.
Add a Trend
Trends are another type of field calculation that provide an overview of how a project is changing over time. Trend calculation fields in OnePlan display a graphical representation of the underlying trend calculation.
NOTE: Status Reports must be enabled for the field you would like to capture trends for. See Install and schedule Status Reports.
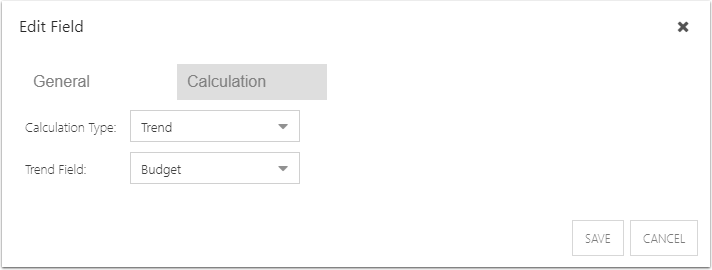
To add a trend calculation to a field:
Go to the desired plan field under the Plan Fields topic heading. Click the Edit icon next to the field you would like to add a calculation to. The Edit Field form will open.
You can also create a new field and add a calculation. See Create and edit fields to create a new field, then proceed with the rest of the procedure.
Select the Calculations heading in the Edit Field form.
Select Trend in the Calculation Type drop down.
Complete the Edit Calculation form.
Trend Field: Select the field to capture trend data over time.
Click SAVE.