Create and Manage Plan-Level Notifications
This article explains how to create and manage plan-level notifications. This means that you can create notifications for plans at any level, including portfolios, programs, projects, etc.
Plan-Level Notification Variables
{PlanName}: When creating single plan notifications, users can include the Plan Name by simply entering {PlanName} in the subject line.
Create a Plan-Level Notification
Note
The Plan Notifications schedule must be enabled by your administrator before you can create any plan-level notifications.
Who can create plan-level notifications?
Users with "Manage Data" permissions (typically owners and managers) can create global notifications across all or many plans.
Plan owners can create notifications around plans they own.
What kind of notifications can I create?
Notifications can be triggered when a field changes, when a date passes, or when a process step changes. This allows you to be notified when important plan updates occur.
Where can I create plan-level notifications?
You can create plan-level notifications from 2 locations in OnePlan: The My Portfolio area, and from within a plan. The instructions below detail each scenario.
Create a Notification from the My Portfolio Area
Note
Only users with "Manage Data" permissions can create notifications in the My Portfolio area. These notifications will be global notifications and will apply to all plans that meet the set criteria.

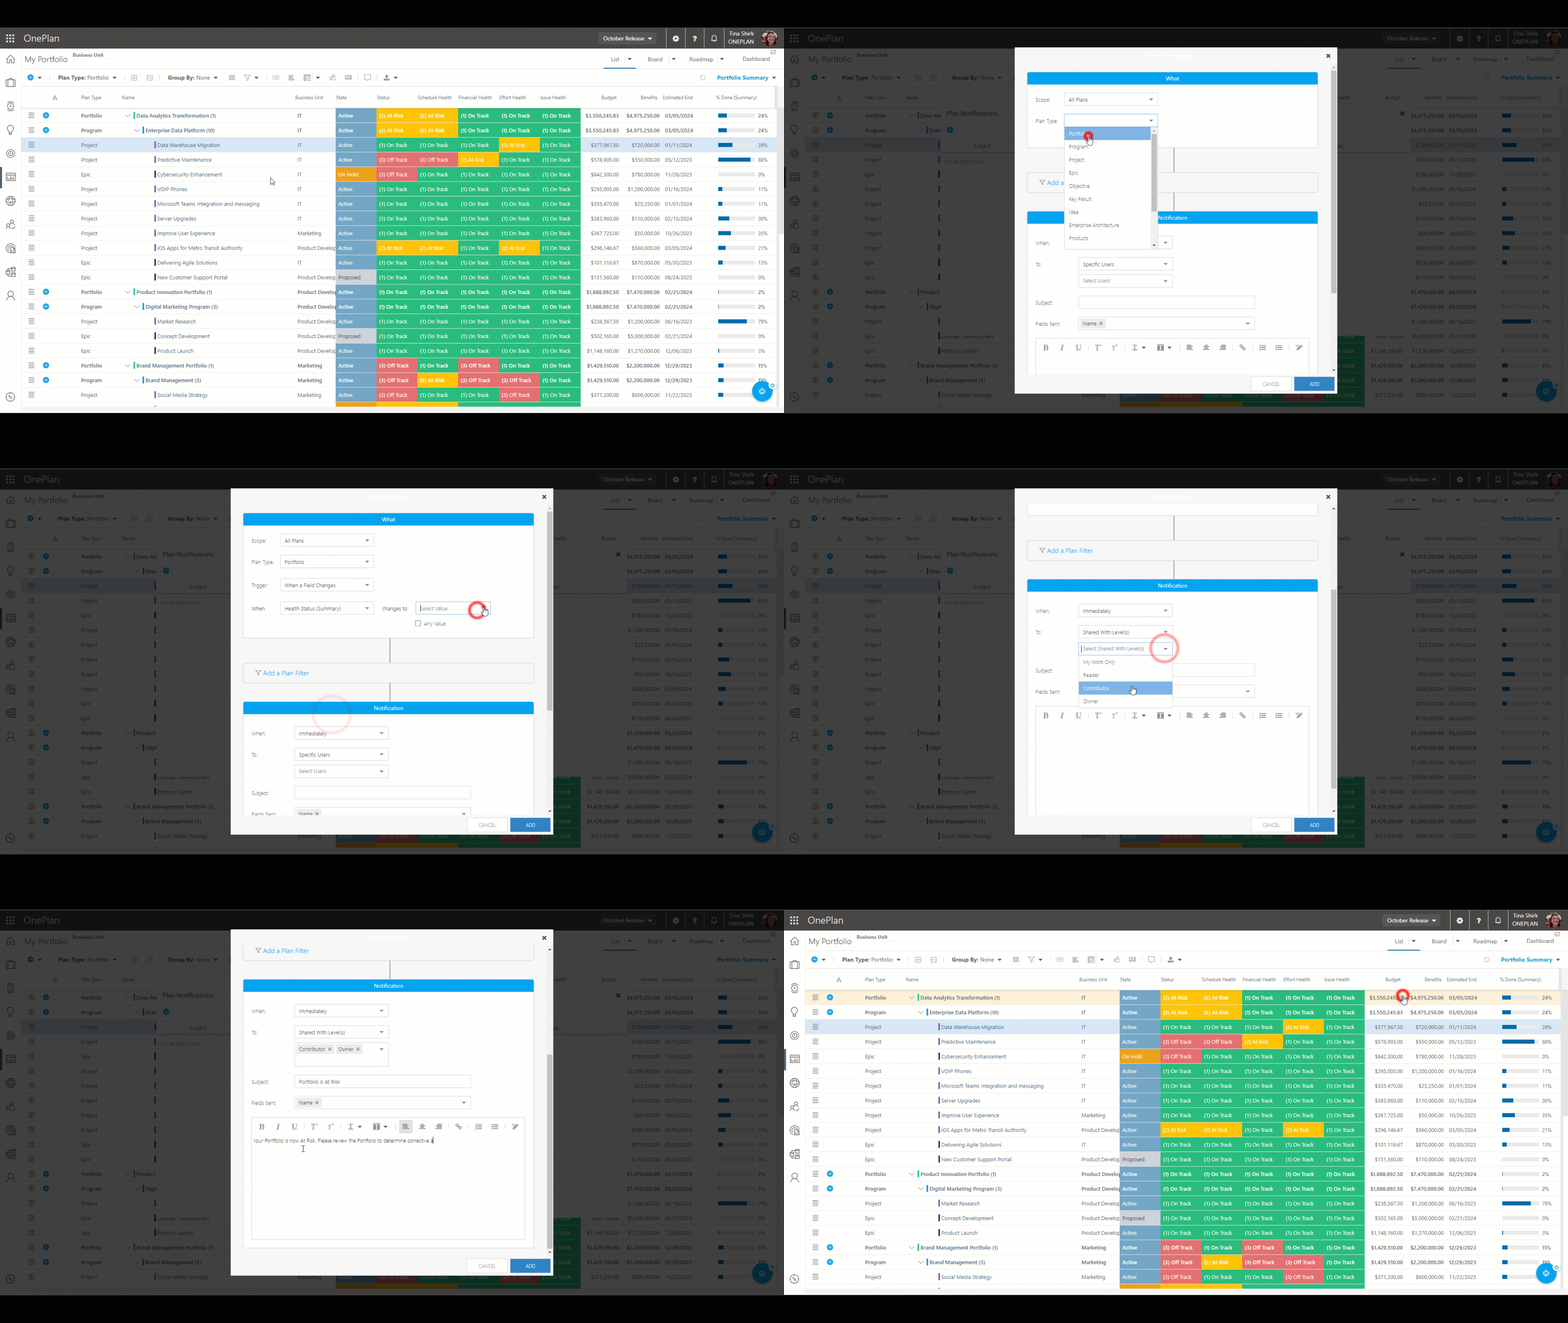
Go to the My Portfolio area.
Click on the Notifications icon in the header. The Plan Notifications form will open.
Click the Add Notification icon. The Add Notification form will open.
Complete the Add Notification form.
Select the Scope for the notification. When you create notifications from the My Portfolio area, the Scope will be All Plans. This means the notification will apply to all plans in your environment that meet the criteria you set in the notification settings (e.g. all Programs, all Projects).
Select the Plan Type that this notification will apply to. Options include all configured plan types in your environment (e.g. Portfolio, Program, Project, Epic).
Select the Trigger that needs to be met for the notification to be sent. Options include When a Field Changes, When a Date Passes, and When a Step Changes. The form dynamically changes based on your selection here.
When you select When a Field Changes: The When and Changes To fields will appear.
In the When field, select the plan-level field that will be used to trigger the notification.
In the Changes To field enter or select the value that the When field needs to change to for the notification to be triggered.
So, for example, you can create a notification that will trigger when the Effort Health field changes to At Risk.
You can also check the Any Value check box which will trigger a notification to send any time the When field changes.
So, for example, you can create a notification that will trigger when the Active Risks field changes to any value.
When you select When a Date Passes: The Field field appears.
Select the date field that will be used to trigger the notification. When the date in the selected field passes, the notification will be triggered and sent out.
When you select When a Step Changes: The When and Changes To fields will appear.
The When field will be auto-populated with Process Step.
In the Changes To field, select the step that, when a user changes the process flow to the selected step, the notification will be triggered.
So, for example, you can create a notification that will trigger when the Process Step changes to Active.
You can also check the Any Value check box which will trigger a notification to send any time the When field changes.
So, for example, you can create a notification that will trigger when the Process Step changes to any value (e.g. Active, Closed, Proposed)
(Optional) Add Filters to the notification. You can create notification filters on any plan-level field.
Select When the notification will be sent out once it has been triggered. When you create notifications from the My Portfolio area, all notifications will be sent out Immediately.
Select who the notification will be sent To.
First, select how the system will determine the users to send the notification to. Options in this first drop-down include Specific Users, Field, and Shared With Level(s).
If you select Specific Users, search for and select the desired user.
If you select Field, select the plan-level user field to determine the recipient. For example, you can select Project Lead, and the notification will send out to the user who us assigned as the Project Lead for a given project.
If you select Shared With Level(s), select the Shared With permission levels you would like the notification to send out to. For example, you can select Owners and Contributors. The notification will send out to users with either Owner or Contributor permissions to the plan.
Enter the Subject of the notification. Think of this as the email subject for this message.
Select the Fields Sent to include in the notification message. The fields selected here will populate a table appended to the bottom of the notification message body.
Draft the message body for the notification. Think of this as the email body for this message. Tell the recipients what they need to know and any actions that are required of them when this notification is sent out.
Click Add. Your new plan-level notification will now be active and available.
Create a Notification from a Plan
Note
Typically, plan owners will create notifications from within a plan. Notifications created within a plan only apply to the plan owner's various plans, or the current plan. These notifications are not global.

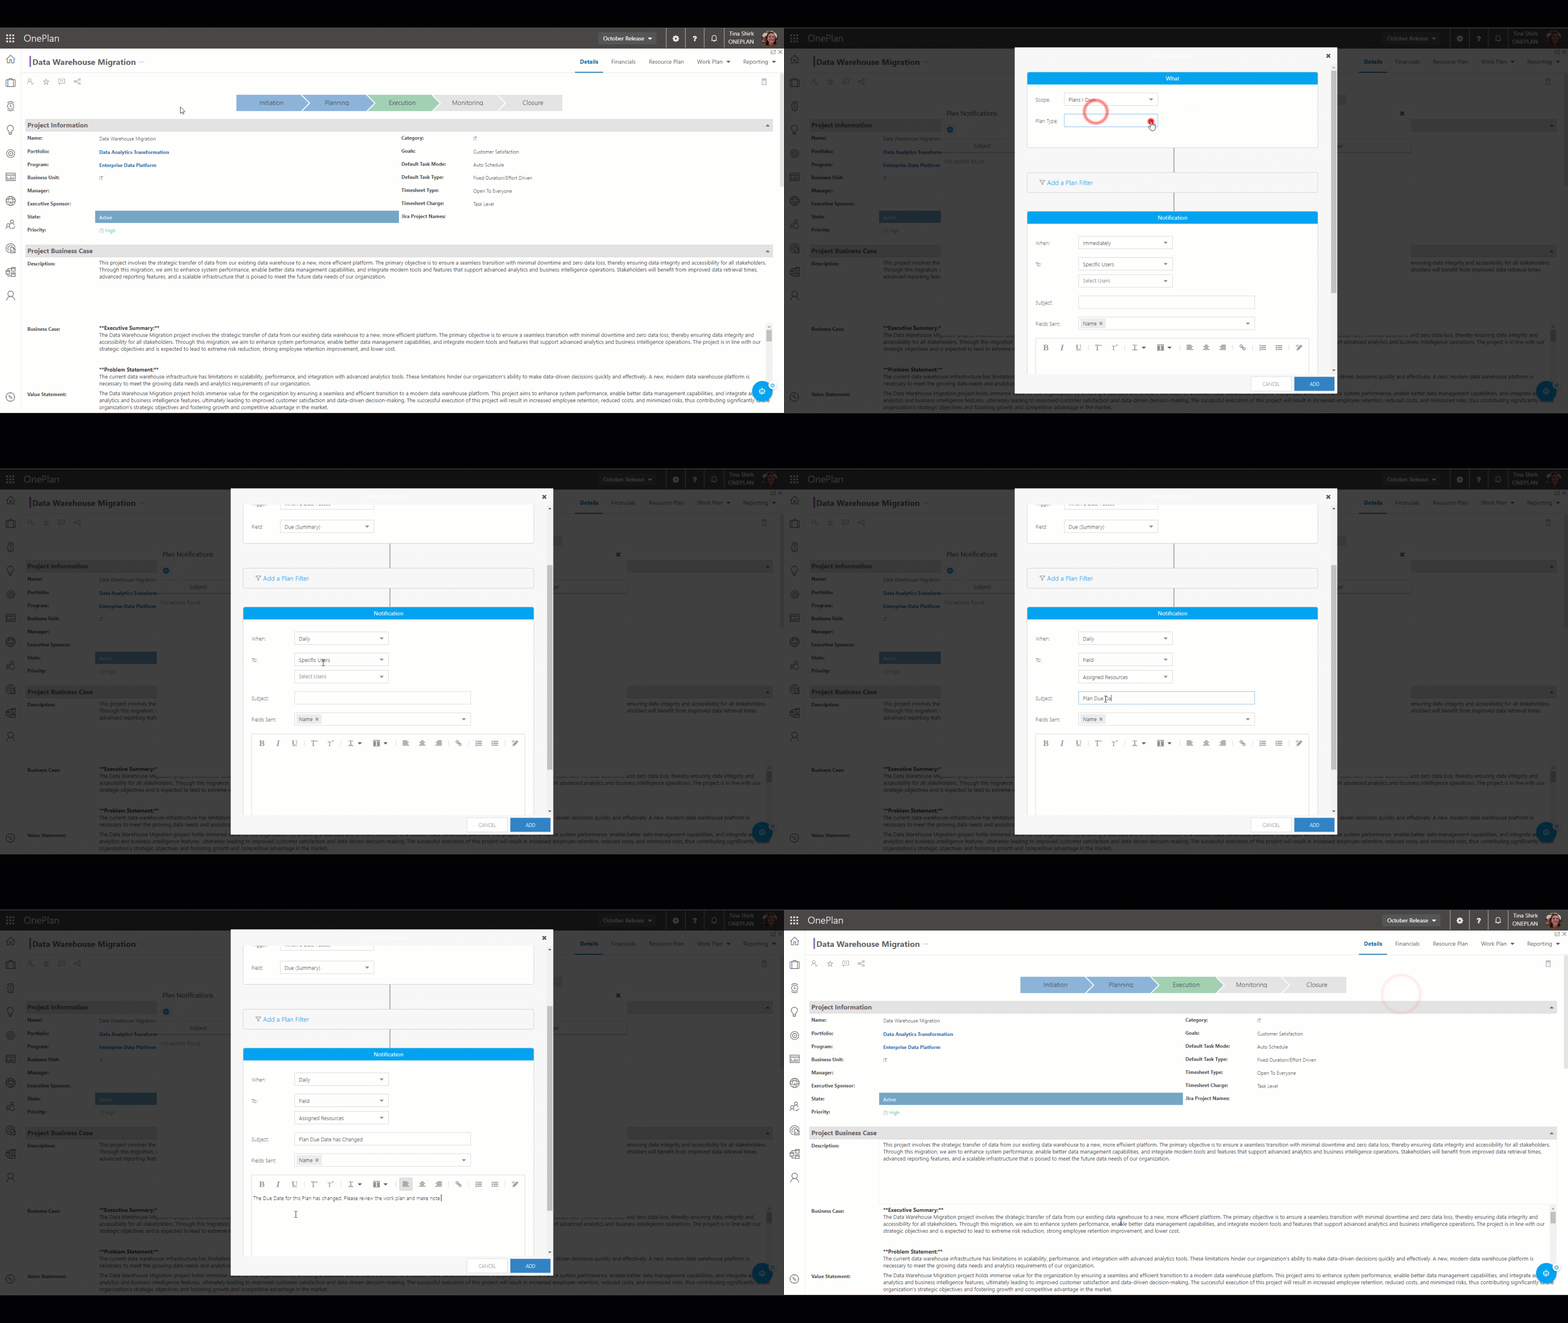
Go to the Details section of a plan.
Click on the ellipsis next to the plan name. Select Notifications from the drop-down. The Plan Notifications form will open.
Click the Add Notification icon. The Add Notification form will open.
Complete the Add Notification form.
Select the Scope for the notification. Options include Plans I Own, and This Plan.
If you select Plans I Own, the notification will apply to all plans that you are an owner of.
If you select This Plan, the notification will apply to only the current plan.
Select the Plan Type that this notification will apply to. Options include all configured plan types in your environment (e.g. Portfolio, Program, Project, Epic).
Select the Trigger that needs to be met for the notification to be sent. Options include When a Field Changes, When a Date Passes, and When a Step Changes. The form dynamically changes based on your selection here.
When you select When a Field Changes: The When and Changes To fields will appear.
In the When field, select the plan-level field that will be used to trigger the notification.
In the Changes To field enter or select the value that the When field needs to change to for the notification to be triggered.
So, for example, you can create a notification that will trigger when the Effort Health field changes to At Risk.
You can also check the Any Value check box which will trigger a notification to send any time the When field changes.
So, for example, you can create a notification that will trigger when the Active Risks field changes to any value.
When you select When a Date Passes: The Field field appears.
Select the date field that will be used to trigger the notification. When the date in the selected field passes, the notification will be triggered and sent out.
When you select When a Step Changes: The When and Changes To fields will appear.
The When field will be auto-populated with Process Step.
In the Changes To field, select the step that, when a user changes the process flow to the selected step, the notification will be triggered.
So, for example, you can create a notification that will trigger when the Process Step changes to Active.
You can also check the Any Value check box which will trigger a notification to send any time the When field changes.
So, for example, you can create a notification that will trigger when the Process Step changes to any value (e.g. Active, Closed, Proposed)
(Optional) Add Filters to the notification. You can create notification filters on any plan-level field.
Select When the notification will be sent out once it has been triggered. Options include Immediately, Daily, or Weekly.
If you select Immediately, the notification will be sent out as soon as it has been triggered.
If you select Daily, once the the notification is triggered, it will send out daily based on the Plan Notification schedule configured by your administrator.
If you select Weekly, once the notification is triggered, it will send out once a week. The Day of Week field will appear. Select the day you would like the notification to send out.
Select who the notification will be sent To.
First, select how the system will determine the users to send the notification to. Options in this first drop-down include Specific Users, Specific Teams, Field, and Shared With Level(s).
If you select Specific Users, search for and select the desired user(s) you would like the notification to be sent to.
If you select Specific Teams, search for and select the desired team(s) you would like the notification to be sent to.
If you select Field, select the plan-level user field to determine the recipient. For example, you can select Project Lead, and the notification will send out to the user who us assigned as the Project Lead for a given project.
If you select Shared With Level(s), select the Shared With permission levels you would like the notification to send out to. For example, you can select Owners and Contributors. The notification will send out to users with either Owner or Contributor permissions to the plan.
Enter the Subject of the notification. Think of this as the email subject for this message.
Select the Fields Sent to include in the notification message. The fields selected here will populate a table appended to the bottom of the notification message body.
Draft the message body for the notification. Think of this as the email body for this message. Tell the recipients what they need to know and any actions that are required of them when this notification is sent out.
Click Add. Your new plan-level notification will now be active and available.