Build cost types
This article explains how to create and manage cost types for OnePlan. This requires the app 'Financial Plan' is installed. Before building out cost types, first configure your cost categories. Then, on the Cost Types page, select which cost categories are shown for each Cost Type.
Go to the Admin pages, select Financial Plan in the navigation. Then, expand the Cost Types topic heading.
NOTE: The Cost Types page shows on both the Financial Plan & Resource Plan settings pages, regardless whether some cost types are only for financial or resource planning (or both).
What are Cost Types? Cost types allow organizations to calculate, evaluate and monitor what financial costs are planned, actually spent, and also financial gains.
Your organization may have similar or different cost types depending on business use cases and configuration. Here are some common general uses that may apply, for reference.
A Budget is the initial plan for what is estimated to be spent on this initiative. Expected costs are entered into cost categories. A cost category is how costs or gains are broken out into smaller defined categories. These are often organized as whether they are labor costs, and also whether they fall into expense type buckets, such as capital or operational expenses.
Once the Budget gets approved and a plan moves forward in the process, The Forecast costs are often used as the ongoing expected or estimated costs, updated as the plan or initiative continues. The forecast costs can be entered manually, or copied from another cost type, such as Budget. Then, updated as needed.
The Actuals cost type shows what has already been spent on the plan.
Another common example of a cost type is Benefits. This is where you would track what is expected to be gained from this plan. Notice the cost categories would be different in terms of what is gained vs another cost type for financial spend.
Add a new cost type
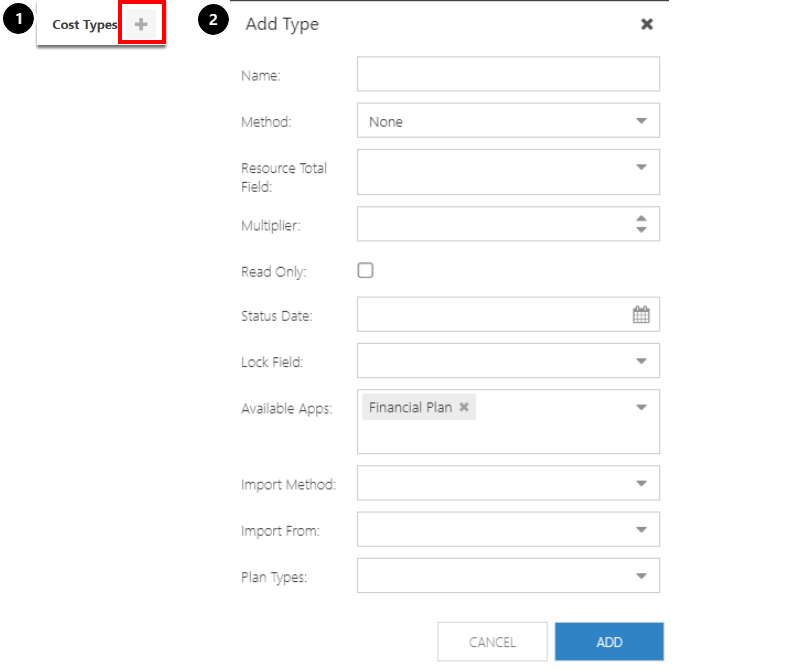
Click the New Cost Type (+) button.
Complete the New Cost Type form.
Name: Enter the name of the cost type.
Method: Select None, Even, or TotalofCostType.
Field: If a method is selected as Even or Total of Cost Type, Field will show. Select the plan-level field to where the total sum value or even distribution from this cost type will populate.
Multiplier: Multiply all values by a common multiple. i.e. “1000” if all values are to be 1000x whatever is entered. So, typing 1000 would really be 1,000,000.
Read Only: Check the check box if data is imported/synced from financial system via integration, or only imported from elsewhere, such as the Resource Plan.
Status Date: As applicable, select a date. All costs prior to and including that date will be locked for editing. For example, if it the end of 2019, and all budgets have been approved through July 2019, enter 7/31/2020. Everything prior to July will be un-editable. August 2020 forward will still be editable.
Lock Field: Select the applicable plan-level field that will be used for locking the cost type. This setting is used in conjunction with the Calculations settings.
Available Apps: Select whether the cost type should show in the Financial Plan, Resource Plan, or both.
ImportMethod: Select the cost import method. Options include BlendedRates or ActualRates. Blended rates are a standardized rate for a role or business unit. Actual rates are an individual resource's actual rates.
Import From: Select the source for the cost import, if applicable. Typically, the Resource Plan cost types import into the Financial Plan cost types. You may need to create the Resource Plan cost type from which this cost type's data will come. Then, come back in here and select the source cost Import From option.
Auto Import:Available when Import From is set to Resource Schedule or Timesheets. Check the check box to auto import the cost type to the set location.
NOTE: For Auto Import to function, you must setup the Cost Type Import schedule. See Enable automatic cost imports for instructions.
NOTE: Selecting Auto Import for a cost type will capture daily Resource Plan data, even if the schedule is set to another time period. This is because the auto import function brings in both resource data tasks. The task related functionality only works when the data is daily. You can bring in other time period data (monthly, for example) by using the Import button in the Resource Planner.
Plan Types: Select which plan types will see this cost type on the Financial Planner. Select one or multiple that apply.
Enable automatic cost imports
To enable automatic cost imports:
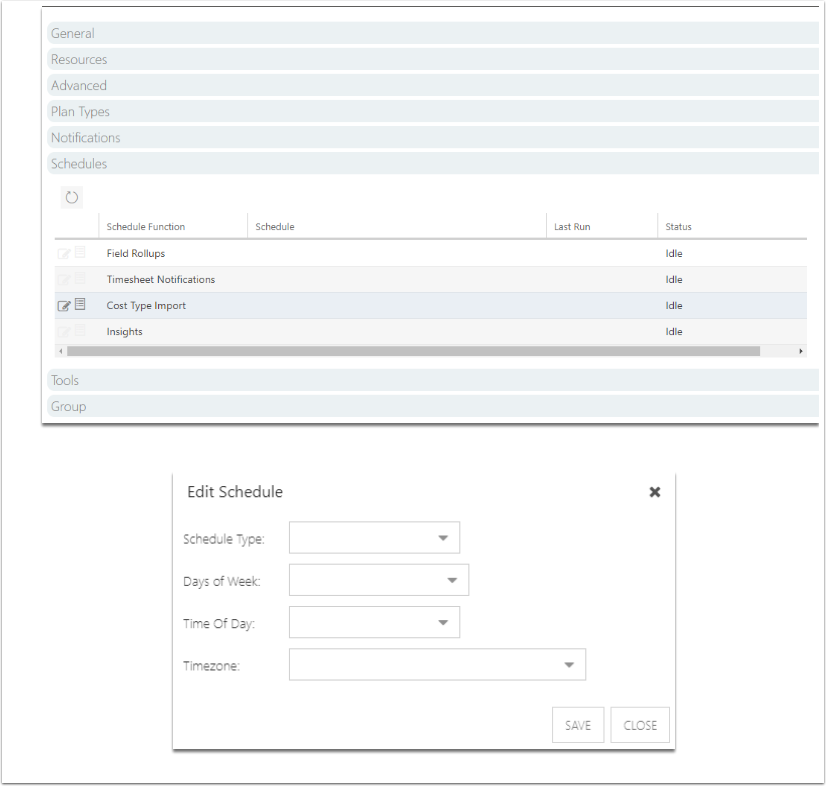
Go to the Admin pages, select General in the navigation. Then, expand the Schedules topic heading.
Select the Edit icon for the schedule function Cost Type Import. The Edit Schedule form will open.
Complete the Edit Schedule form:
Schedule Type: Select the type of schedule to run the Cost Type Import function. Options are Daily and Monthly.
Days of Week: Select which day(s) of the week to run the Cost Type Import function.
Time of Day: Select the time of day to run the Cost Type Import function.
Timezone: Select the timezone where the function schedule will run.
Select Save. Cost type imports will now automatically run on the schedule you have set.
Cost type menu
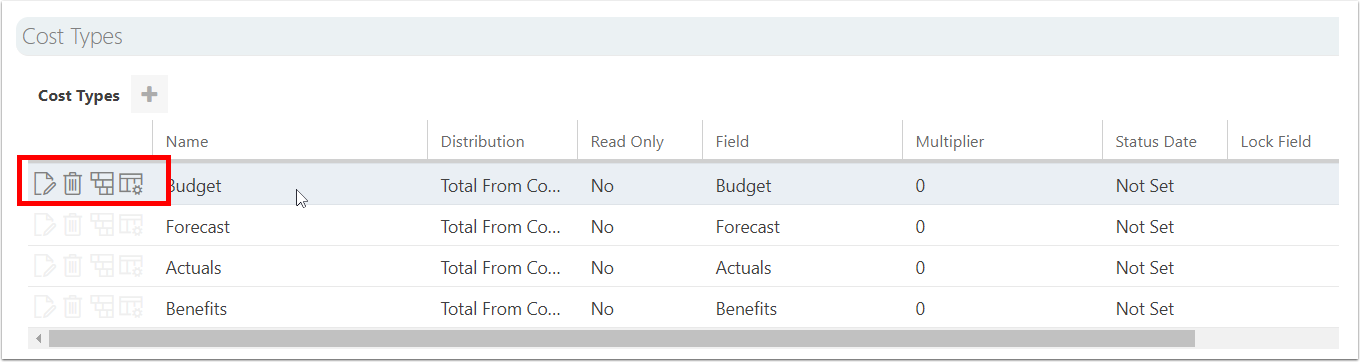
Edit
Delete
Cost Categories: Click the Cost Categories icon to configure which cost categories will show for each cost type.
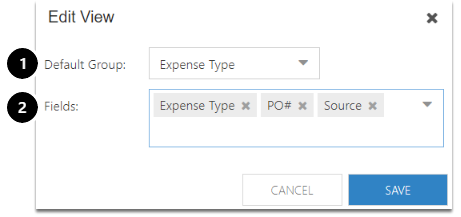
View Config: Click View Config to manage the default grouping & which cost category fields show for each cost type.
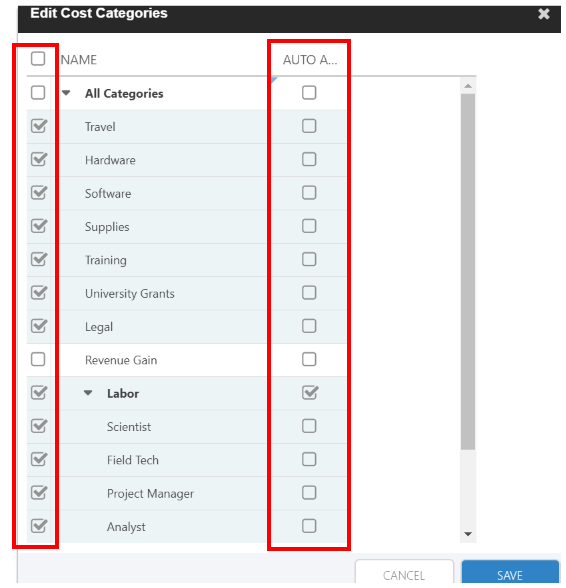
Edit cost categories
Select the check boxes for the applicable cost categories for this cost type. If you select a parent/summary row, all children rows beneath will be checked. Leave the check boxes clear for any categories that don't apply.
Auto Add: Select the check box if you want to have any newly created children cost categories to be auto-added to this cost type. For example, if you have the Labor cost categories selected, with the Auto Add check box selected, if a new role were added to Roles configuration, that role cost category would automatically be added and selected for this cost type.
Edit cost view
Select a Default Group field. If left blank, the default will be No Group.
Select any applicable cost category fields for this cost type.